Sweet Surrender
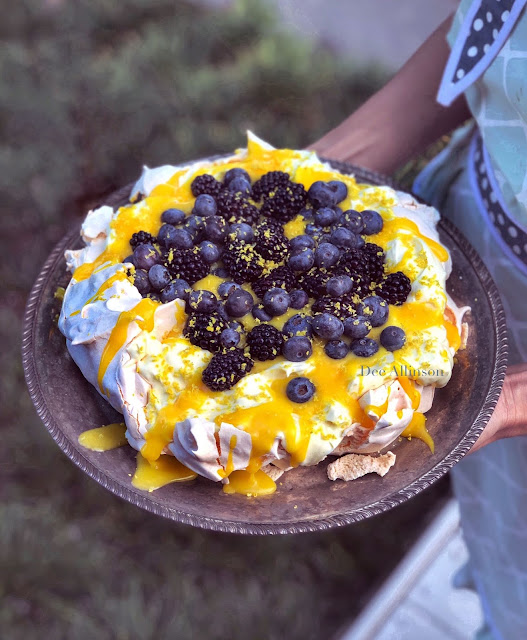
No. 199 ‘Sweet Surrender’
Lemon Curd Blackberry & Blueberry Pavlova
Date Made Dec 9th, 2018
Keep Calm
Be Merry
and
Make Pavlova

© Dee Allinson
One of my personalities (Yes, I have many. But I'd say having many personalities is better than having no personalities at all. 😁) is researching as I was a professor in the university for many years. (Old habits die hard I think.) So in order to make my first pavlova, I read, and read, and read. Until I found the recipes which sound right to me. The recipe I write below I've adjusted all recipes I read to fit my sense that it'd have the taste and texture I like it to be. Another plus about pavlova besides being beautiful is there will be no more pressure about Christmas dessert since you can prepare pavlova base in advance like the night before and up to 5 days for the lemon curd. Now let's make this pavlova. Keep calm and be merry!

© Dee Allinson
Ingredients
Meringue
1. 1 Cup of Fine Caster Sugar
2. 1 Tablespoon Cornstarch (Sift it)
3. 125 g Egg White at Room Temperature 30 Minutes (From around 3 eggs and make
sure there are no traces of yolk in the whites)
4. 1 Teaspoon Distilled White Wine Vinegar
5. 1/4 Teaspoon Fine Salt
6. 3 Tablespoons Very Coldwater
Whipped Cream
7. 1 Cup Cold Thicken Cream
8. 1 Teaspoon Limoncello
Lemon Curd
9. 2 Fresh Eggs
10. 2 Egg Yolks
11. 80 g Unsalted Butter (Soft/Room Temperature)
12. 160 g Caster Sugar
13. 8 Tablespoons Lemon Juice
14. 1 Teaspoon Lemon Zest
15. 3 Drops of Yellow Color (Optional)
To make Lemon Curd you will also need
A large bowl of cold water with ice. (1/2 of a bowl)
Topping
15. Blueberry, Blackberry, and Lemon Zest as you wish.
To Make Meringue
You can prepare the meringue 1 night in advance.
1. Preheat your oven at 150 Celsius with the fan mode with a rack in the middle.
2. Draw a 7-inch circle on a sheet of parchment paper with a pencil. Turn the parchment paper over and put it on a baking tray. The reason why we have to turn the parchment paper over is to prevent our meringue from the circle mark. The pavlova will get a bit bigger as it bakes, so make sure you have a little space around your circle.
3. In a very clean dry high-edge bowl*, pour egg white (125 g) in together with salt (1/4 Tsp). Beat them with an electric mixer** (I used a handheld mixer** and it turned out just fine) at medium speed until they form soft peaks.
4. Add Coldwater (3 Tbs) and beat until they form soft peaks again.
5. Increase speed to medium-high and beat in sugar (1 Cup) 1 Tbs at a time. After you add 1 Tbs of sugar in, count 1-10 while keep beating then add another 1 Tbs. Do this step repeatedly until all sugar has been added and continue beating for 1 more minute.
6. After all sugar is added, scrape the bottom and side of the bowl with a rubber spatula. Then add White Wine Vinegar (1 Tsp) and beat at high speed until the meringue is glossy and holds stiff peaks. It should take about 5 minutes. Rub the meringue between your fingers to check if the sugar is completely dissolved. You should not feel any sugar crystals.
7. Add Cornstarch (1 Tbs) and gently fold it in until mix well. Don't over mix it.
8. Now it's time to bring out your artistic part. Fold the meringue inside the circle on the parchment paper. Spread it gently with a spatula and try to make the edge slightly higher than the centre as "the crater" is for holding curd and fruits. Don't overwork the meringue.
9. Use your finger and scrape the meringue left in the bowl or on the spatula. Dash it at all 4 corners of the back of the parchment paper for it to act as a glue and the paper will attach properly to the baking tray. Otherwise, the paper might be blown over your meringue.
10. Put the tray in the oven. Bake for 50 - 55 minutes or until the meringue turns to pale golden colour and has a crust. I found this step quite a little bit tricky since every oven could be slightly different. For mine, I've noticed that the heat generated from the back and the right is stronger than the left. So I have to place my meringue slightly further left. And don't be too curious, while baking please try not to open the oven.
11. Turn the oven off and pop the door open slightly with a wooden spoon. Don't open it all the way. Leave the meringue in the oven and let it gradually cool down. It should take 3 hours until it is completely cool. You can also leave the meringue in the oven overnight. The meringue might crack as it cool. This is completely normal.
To Make Lemon Curd
You can prepare lemon curd up to 5 days in advance and chilled in the refrigerator until ready to use or you can make it while the meringue is baking.
12. Add 2 eggs, 2 egg yolks, and caster sugar 160 g into a medium mixing bowl***. Whisk everything together until just combined.
13. Add lemon juice (8 Tbsp). Mix with a whisk**** until combined.
14. Pour the egg mixture into a medium saucepan*****. Add butter (80 g) and lemon zest (1 Tsp) over very low heat and bring it to simmer (Have tiny bubbles bubbling around the edge, not boiling). Stir constantly with a wooden spoon until butter melts. After butter melts the curd will start to get thicken (do not let it boil). Remove the pan from the heat. Check if your lemon curd is ready (or not too runny) by scraping your finger along the back of your wooden spoon. If it leaves the mark, it is ready. If the lemon curd still runs around the back of the spoon, then cook it a little bit longer and check again.
15. Put your saucepan into a bowl of cold water and ice for your lemon curd to cool down quickly. Stir constantly until cold. At this stage, the colour will be paler than when it was hot. You can add a couple drops of yellow food colouring to the curd if you wish.
16. Put a sieve over a bowl and pour the curd through a sieve. This is just up to my liking since I like my curd to be smooth like custard but you can also skip this step and leave the zest in lemon curd too.
17. Now your lemon curd is in a bowl. Cover it with cling wrap and make sure it is attached to the surface of lemon curd otherwise, the lemon curd will get harden. Put it in the fridge until chilled, around 1.5 hours. Once you are ready to assemble your pavlova, simply take it out of the fridge and stir it a little bit to loosen.
Assemble Pavlova
18. Add thickened cream (1 Cup) and Limoncello (1 Tsp) into a bowl and beat it with a handheld mixer until it starts to form firm peaks.
19. Pile the whipped cream in the centre of the meringue. Gently spread it with an icing spreader into the form you like.
20. Pour lemon curd on top of the whipped cream. Spring the desired amount of berries on top together with fresh lemon zest.
To Be Remembered
At step 3 : Any trace of fat would cause the whites not to rise or whip properly. So make sure the bowl and the whisk are clean and dry.
Link and Review
* Avanti Stainless Steel Mixing Bowl 26cm This anti-slip high edge mixing bowl helps prevent you from an accident in the kitchen. Accident happens but we can make sure the rate is low with this one.
** Kenwood hand mixer No standing mixer, no problem!
*** Rosti Margrethe White Mixing Bowl 2L Once we know we have to mix/whisk then pour why don't we use the bowl that will save us from the messiness? This bowl is the answer.
**** OXO Balloon Whisk 28cm Try it and you will know the grip is different.
***** Essteele Saucepan 16cm The perfect saucepan exists and this is it.
13. Add lemon juice (8 Tbsp). Mix with a whisk**** until combined.
14. Pour the egg mixture into a medium saucepan*****. Add butter (80 g) and lemon zest (1 Tsp) over very low heat and bring it to simmer (Have tiny bubbles bubbling around the edge, not boiling). Stir constantly with a wooden spoon until butter melts. After butter melts the curd will start to get thicken (do not let it boil). Remove the pan from the heat. Check if your lemon curd is ready (or not too runny) by scraping your finger along the back of your wooden spoon. If it leaves the mark, it is ready. If the lemon curd still runs around the back of the spoon, then cook it a little bit longer and check again.
15. Put your saucepan into a bowl of cold water and ice for your lemon curd to cool down quickly. Stir constantly until cold. At this stage, the colour will be paler than when it was hot. You can add a couple drops of yellow food colouring to the curd if you wish.
16. Put a sieve over a bowl and pour the curd through a sieve. This is just up to my liking since I like my curd to be smooth like custard but you can also skip this step and leave the zest in lemon curd too.
17. Now your lemon curd is in a bowl. Cover it with cling wrap and make sure it is attached to the surface of lemon curd otherwise, the lemon curd will get harden. Put it in the fridge until chilled, around 1.5 hours. Once you are ready to assemble your pavlova, simply take it out of the fridge and stir it a little bit to loosen.

© Dee Allinson
Assemble Pavlova
18. Add thickened cream (1 Cup) and Limoncello (1 Tsp) into a bowl and beat it with a handheld mixer until it starts to form firm peaks.
19. Pile the whipped cream in the centre of the meringue. Gently spread it with an icing spreader into the form you like.
20. Pour lemon curd on top of the whipped cream. Spring the desired amount of berries on top together with fresh lemon zest.
To Be Remembered
At step 3 : Any trace of fat would cause the whites not to rise or whip properly. So make sure the bowl and the whisk are clean and dry.
Link and Review
* Avanti Stainless Steel Mixing Bowl 26cm This anti-slip high edge mixing bowl helps prevent you from an accident in the kitchen. Accident happens but we can make sure the rate is low with this one.
** Kenwood hand mixer No standing mixer, no problem!
*** Rosti Margrethe White Mixing Bowl 2L Once we know we have to mix/whisk then pour why don't we use the bowl that will save us from the messiness? This bowl is the answer.
**** OXO Balloon Whisk 28cm Try it and you will know the grip is different.
***** Essteele Saucepan 16cm The perfect saucepan exists and this is it.

Comments
Post a Comment